I urge you to read my PVS 6.1 on XenDesktop/Windows 7 guide first. Read it and make sure you understand it. The same concepts and most all procedures apply to Server 2008 R2. So I am not going to get as detailed on PVS technology in this article. This is going to be more XenApp centric. If you don’t have a thorough understanding of PVS, it is easy to become lost so please make sure and read that article and go through those screenshots first.
Citrix has an excellent eDoc primer for understanding the intricacies of XenApp on PVS located here. I recommend skimming this before beginning:
http://support.citrix.com/proddocs/topic/xenapp65-install/ps-image-prep.html
Now on to the steps. This is just my way of doing it. It works well for me. There are a couple of different ways you can achieve the same thing so use what works for you:
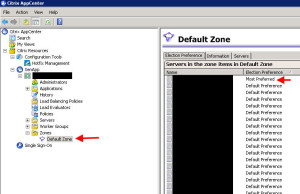
1. I am assuming you already have a XenApp 6.5 farm created and at least one dedicated server for the role of the ZDC. All XenApp servers provisioned via XenApp will be member servers of this farm and you do not want them to become a ZDC. Just set the election preference in AppCenter under Zones. In this example, I have a Default Zone and have set one server as the ZDC but it is best practice to have at least a handful of servers that are not provisioned to be set as preferred. Just in case one goes down, you don’t want one your provisioned servers to become a ZDC:
2. Now go to your XenServer and create a new Server 2008 R2 VM
3. Install XenServer Tools
4. Make a copy of the VM and convert it to a template. This is your “clean” Server 2008 R2 image you can come back to later if you need to. You can spin up new VMs from it.
5. Now go back to the VM you were working on and install things that are needed on all servers like Symantec, Citrix Offline Plugin (if you intend to leverage app streaming), etc. but try to keep it as clean as possible. Remember, you are building just the base right now. Don’t install any applications you plan to publish yet.
6. Add the server to the domain. Make sure the name is the first server in your naming scheme, example: “ServerName-100” where 1 denotes the image number and 00 is the VM number. The next VM that gets spun up using this image will be ServerName-101 and so on.
7. Begin installation of XenApp 6.5 like normal and follow Approach 3 detailed here:
http://support.citrix.com/proddocs/topic/xenapp65-install/ps-image-prep.html
8. If you have multiple NICs in your PVS environment for streaming vs. regular network traffic there’s an extra step you have to perform in the VM. Make sure you go into ICA Listener properties and set it to PVS Adapter #1, the network NIC. Not the PVS streaming NIC which is #0. They may be labeled differently in your environment depending on the NIC order of your VM. Just remember, you want the network NIC to handle ICA, not the streaming NIC.
9. Now install the apps you intend to publish. Just install, don’t try publishing anything yet. If you plan on streaming apps to your XenApp servers via Citrix Offline Plugin or App-V, skip this step.
10. Install the PVS Target and reboot. Do not run Imaging Wizard yet.
11. You can choose to install the EdgeSight agent at this point if you use EdgeSight in your environment. There is an excellent guide from Citrix on how to install EdgeSight in a PVS environment below. Don’t worry, when it detects the PVS Target software is on the system and the image is in private mode being updated, it won’t start the EdgeSight service and start sending your EdgeSight server junk data:
http://support.citrix.com/proddocs/topic/edgesight54/es-agent-install-streamed.html
12. Log back in to the VM and in the XenCenter console, set the PVS boot disk to boot first (BDM). Then go to the PVS Console on the PVS server and create a new Device with the MAC address of this VM’s provisioning/streaming NIC. Call the device ServerName-101 so it’s separate from the ServerName-100 original but call the vDisk 100 so you know where the image came from later (i.e. image 1). Set device to Boot from Hard Disk. Now reboot the VM. You can let Imaging Wizard do this but if you really want to be hands on, you can choose to create and attach an empty vDisk of the same size as the c: drive of the VM now.
13. It should have booted from the BDM boot disk and be connected to the empty vDisk you created. Run Imaging Wizard and push the image across to the PVS Server vDisk (don’t forget to optimize the image). If you did not create a vDisk in the above steps, just create a new disk and run through the Wizard prompts to create it real quick. It will assign the device to this new vDisk. Reboot when you are asked to.
14. Log back in and immediately XenConvert will launch and begin pushing your image over to the newly created vDisk.
15. Now go to the PVS console and set your device to boot from vDisk and reboot your VM. It should now be booting from your vDisk.
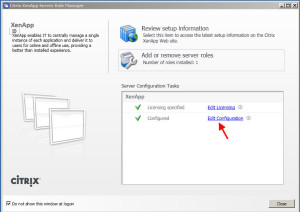
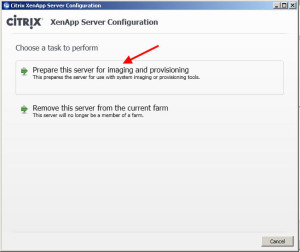
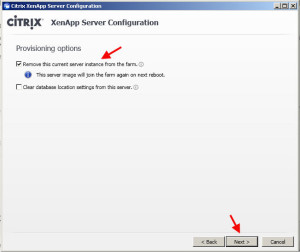
16. Log back in and re-run XenApp configuration and unjoin from farm using the prep option. This is done by going to Start > Programs > Administrative Tools > Citrix > XenApp Server Role Manager > and then clicking on the XenApp Server Role Manager app. Click Edit Configuration. Then click Prepare this server for imaging and provisioning. You want to just leave the defaults checked which is to remove it from the farm and join on the next boot. Once it removes it, it will ask you to reboot. Just close and power down the VM, don’t reboot.
17. Go to your PVS server and change the vdisk from private to standard mode. Now spin up a few VMs using the “Streamed VM Setup Wizard” in the PVS console. You’re going to need a template and you’re going to want to setup your write cache. I’ve covered this very well in my PVS 6.1 on XenDesktop/Windows 7 guide so I’m not going to get into the details here. Wait until the VMs are created and powered on.
18. Go to your ZDC and open up AppCenter and run a Discovery. You should see the new member servers. At this point you can begin publishing or streaming apps to them.
TO MAKE CHANGES AND RESEAL THE IMAGE
1. Boot a device into maintenance mode after creating a maintenance version on the vDisk. Or you can choose to power down all your running VMs and put the disk into private mode. Your choice.
2. Make your changes.
3. Re-run XenApp configuration and unjoin from farm using the prep option.
4. Shut it down and promote the image to production if using versioning. Or put the disk back into standard mode if you used the other method.
5. Reboot all your devices so it gets the new vdisk
I hope this guide helps. Please feel free to leave a comment below if you have any questions. I’ll try and help as best as I can. 🙂
Jason Samuel is a visionary product leader and trusted advisor with a proven track record of shaping strategy and driving technology innovation. With extensive expertise in enterprise end-user computing, security, cloud, automation, and virtualization technologies, Jason has become a globally recognized authority in the IT industry. His career spans consulting for hundreds of Fortune 500 enterprises across diverse business sectors worldwide, delivering cutting-edge digital solutions from Citrix, Microsoft, VMware, Amazon, Google, and NVIDIA that seamlessly balance security with exceptional user experiences.
Jason’s leadership is amplified by his dedication to knowledge-sharing as an author, speaker, podcaster, and mentor within the global IT and technology community. Recognized with numerous prestigious awards, Jason’s contributions underscore his commitment to advancing technology and empowering organizations to achieve transformative results. Follow him on LinkedIn.


Thanks a lot for this article!
Hi Jason, I read your blogs and its quite good and eye opening for me. I need an input from…
I'm with Richard Powell and Andreas Mariotti. Things work if I do it the USB redirection way, but not with…
We see this behaviour with 2203 CU2 VDAs and while being happy, that there is at leasy an workaround without…
Saved my butt without playing around over dozens attempts to get that certificate installed! Thank you! <3 Chris