Did you know you can get Office 365 document previewing capability in Citrix ShareFile with on premise files located on local storage zones in your datacenter? And it can be done in a secure and optimum way using Citrix NetScaler? You need to run a Microsoft Office Web Apps (OWA) server on premises for this integration to work. This product was recently renamed Microsoft Office Online Server (OOS) as of May 2016.
Office Online Server is basically just a farm of document rendering servers you can deploy that can handle all the document previewing requests from your ShareFile StorageZone Controllers. You will not be able to edit documents like you can with full blown Office 365 with files saved on Citrix managed cloud storage however. Office Online servers can do editing by utilizing the same user license as Office 365 but ShareFile does not have the capability to use it right now. Fingers crossed it will eventually. 🙂 If you’re using ShareFile with local storage, I highly recommend setting up Office Online Server for several reasons.
Why do you need Office Online Server with ShareFile?
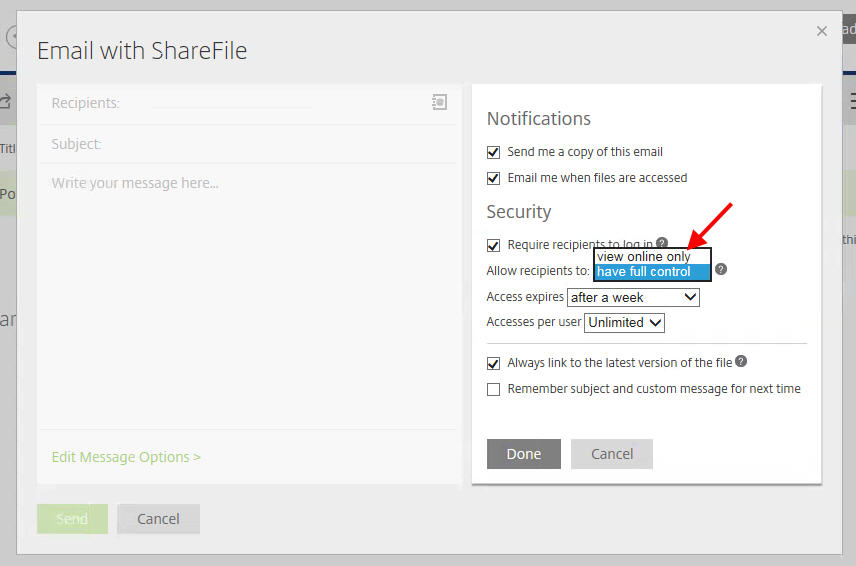
You need an OOS server in order to use “View Online Only” mode with ShareFile local storage zones. This is a wonderful feature that allows you to share files with people while having some level of control over them. This is a feature that gets turned on in the backend by Citrix ShareFile Support. Once it’s flipped on you will now get this option where recipients can only view the file you send them within their browser:
The recepient will see this message when opening the link you emailed them (Office Online Server is being used to preview the doc):

and when the file is opened it will fully render through the Office Online Server and say “Document Protection: Download, print, and clipboard operations are disabled”. All the recipient can do is read the document:

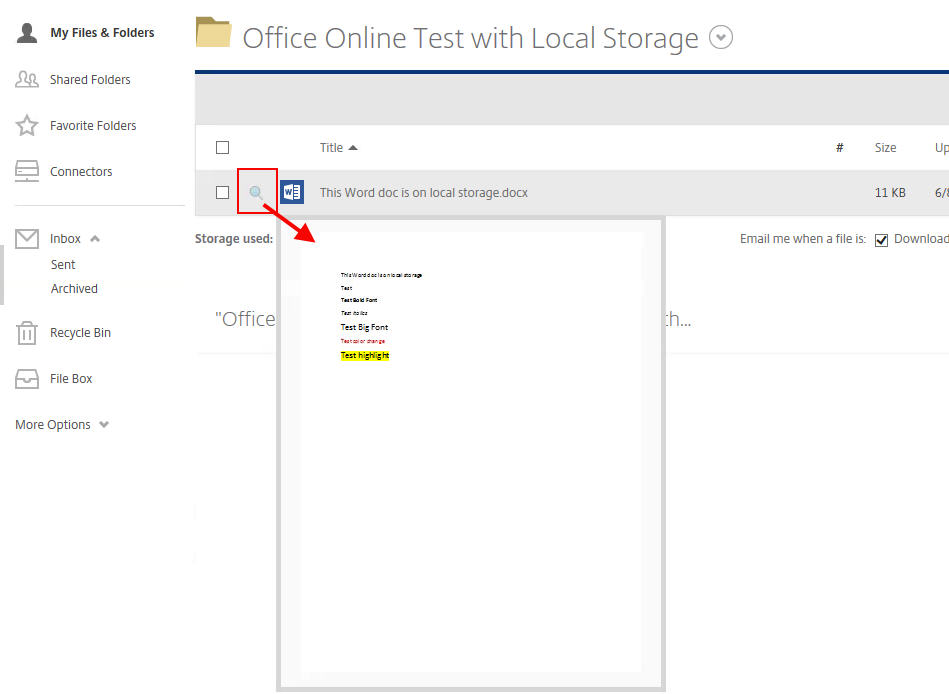
The other reason you need Office Online Server is the document previews. Ever wonder that that little greyed out magnifying glass is for? When you have OOS setup it will preview the document for you when you mouse over it:
And if you click on the magnifying glass, it will open a new tab using Office Online Server to render the document for you. You can now download, print, etc. from right in your web browser:

Where does NetScaler fit in this setup?
You can setup a 2 node or more Office Online Server (OOS) farm front ended and SSL offloaded by Citrix NetScaler. You can put your OOS servers in the DMZ front ended by NetScaler or stand them up internally and front end them with NetScaler sitting in the DMZ. It will depend on what your security requirements are. You can even do both at the same time and use the same URL with internal and external DNS pointed at the internal and external load balanced vservers respectively. It’s all up to your network security architecture on how you want to handle it.
With NetScaler taking care of the SSL overhead (SSL offloading), your OOS web servers can talk plain old HTTP on the backend. This in turn will conserve resources on your web servers. Not to mention the efficient TCP multiplexing capability of your NetScalers you will be taking advantage of with this setup.
Setting up Office Online Server
1. Download the Office Online Server .iso from here: https://www.microsoft.com/Licensing/servicecenter/default.aspx
en_office_online_server_may_2016_x64_dvd_8484396.iso
It will be located under “Office Pro 2016”. Alternatively you can download it from your MSDN subscription.
2. Run the following in an admin PowerShell window:
|
1 |
Add-WindowsFeature Web-Server,Web-Mgmt-Tools,Web-Mgmt-Console,Web-WebServer,Web-Common-Http,Web-Default-Doc,Web-Static-Content,Web-Performance,Web-Stat-Compression,Web-Dyn-Compression,Web-Security,Web-Filtering,Web-Windows-Auth,Web-App-Dev,Web-Net-Ext45,Web-Asp-Net45,Web-ISAPI-Ext,Web-ISAPI-Filter,Web-Includes,InkandHandwritingServices,NET-Framework-Features,NET-Framework-Core,NET-HTTP-Activation,NET-Non-HTTP-Activ,NET-WCF-HTTP-Activation45,Windows-Identity-Foundation |
Will say something like this:
3. Install these 3 pre-reqs
- .NET Framework 4.5.2 <--- may say it's already installed
- Visual C++ Redistributable for Visual Studio 2015
- Microsoft.IdentityModel.Extention.dll
4. Decompress the .iso and install the Office Online Server by running setup.exe
5. Install any language packs you need now. There are available at http://go.microsoft.com/fwlink/p/?LinkId=798136. I chose to do none in this example. You should know that to install language packs after the Office Online Server farm is created, you must remove a server from the farm, install the language pack on it, and then add the server back to the farm. For a language pack to work correctly, you’ll need to install it on all servers in the farm.
6. Reboot server
7. In an admin PowerShell window:
|
1 |
Import-Module -Name OfficeWebApps |
and now to create a farm with 2 nodes:
|
1 |
New-OfficeWebAppsFarm -InternalUrl "https://oos.yourdomain.com" -ExternalUrl "https://oos.yourdomain.com" -SSLOffloaded -EditingEnabled |
8. Do all the same on the 2nd server but instead of step 7 to create a new farm, run this command to point at the first server’s FQDN:
|
1 2 |
Import-Module -Name OfficeWebApps New-OfficeWebAppsMachine -MachineToJoin "YourFirstServersFQDN" |
9. Go to each server and try out the discovery URL using the name of each server:
http://localhost/hosting/discovery
and you should see a bunch of XML. This is the Web Application Open Platform Interface Protocol (WOPI) discovery XML file. Remember this, we’re going to use it in a later step:
Setting up your NetScaler
10. Now go to your NetScaler. We’re going to setup a load balanced vserver that uses SSL Offloading with an SSL cert for https://oos.yourdomain.com bound to it. I’m going to assume you already know how to generate an SSL cert on a NetScaler, if not I’ve talked about it before or please reference my friend and fellow CTP Carl Stalhood’s website: http://www.carlstalhood.com/netscaler-11-certificates/#csr . Once your cert is installed and properly chained:
Go to Traffic Management > Load Balancing > Servers:
11. Now create a Service Group and add the 2 Servers you created to it. Make sure you use “HTTP” as the Protocol. This is because you will be using SSL Offloading on the NetScaler’s front end facing vserver but the back end facing service group is going to be using HTTP:
12. Now add your Service Group members, the 2 servers you just created:

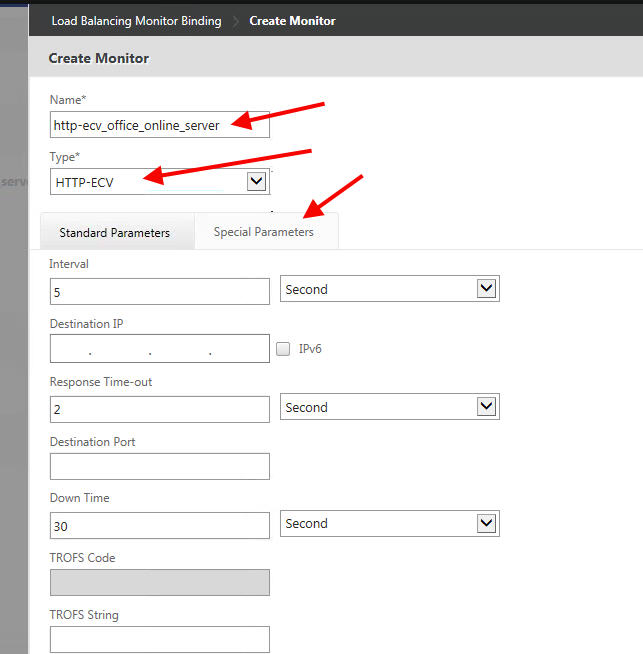
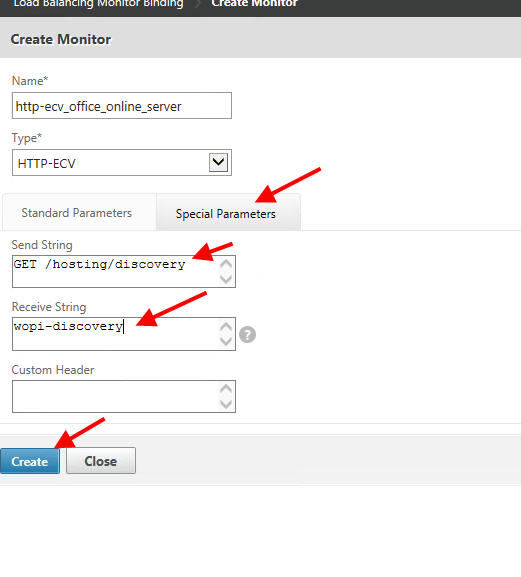
13. Now you need to create a monitor that checks the health of the Office Online servers and see if they are truly up before sending traffic to them. We’re going to use an HTTP-ECV monitor and point at the WOPI discovery URL for this. Extended Content Verification (ECV) monitors actually check for things in the response (the first 24 KB of the body to be exact) instead of relying on pings. This makes sure the Office Online web service itself is actually functioning and not just checking if the server or IIS are functioning only:

14. Now hit Done and the service group shoud be lit up green:
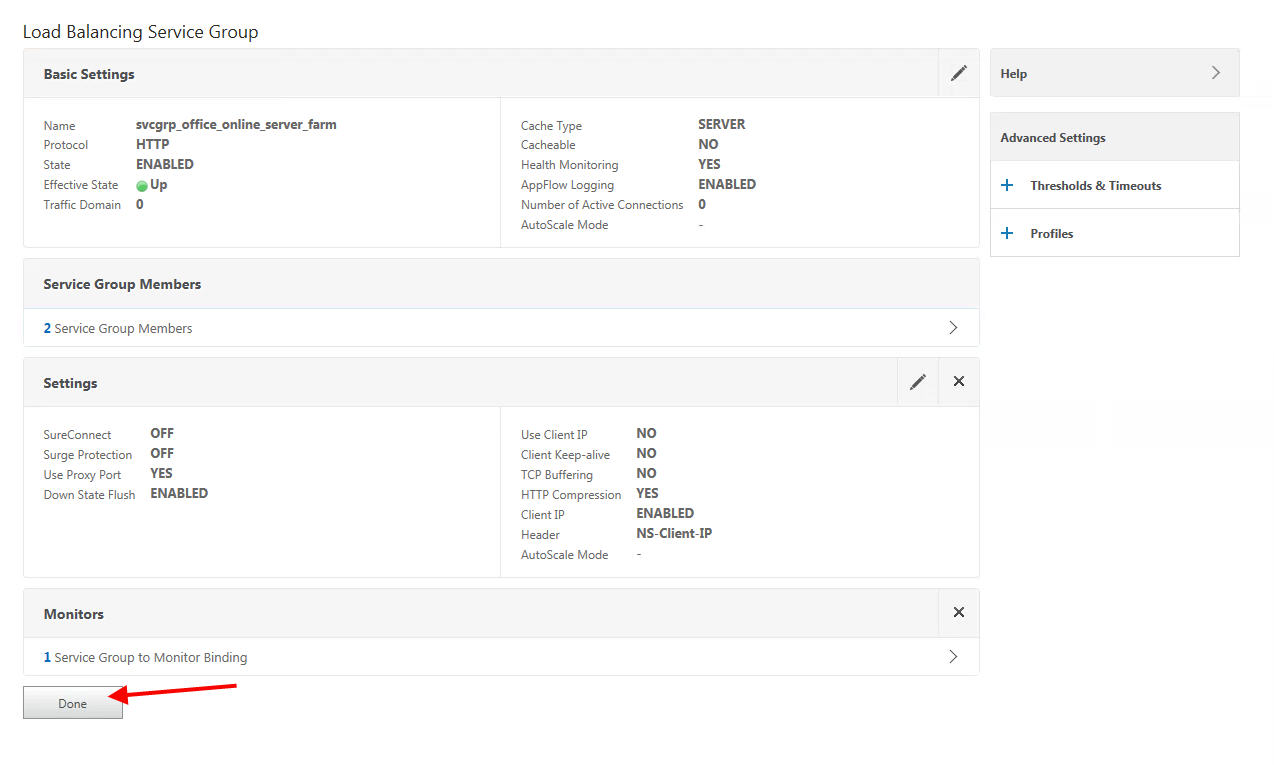
15. Now let’s create an SSL load balanced vserver for the Office Online servers:
16. Now let’s bind the service group you created to it:

17. Now let’s bind the SSL cert you installed previously:

18. Don’t forget to harden your SSL settings. You can manually change your SSL Ciphers and SSL Parameters using the pencil icon but the best way to do this on newer NetScaler firmware is by using an SSL profile that can be bound to multiple vservers. You can set your SSL Profile by clicking the option on the right hand side if you have one. Even doing the basics like disabling SSLv3 and using Diffie Hellman with unique keys would be a vast improvement to keep your vserver secure. Note I have an arrow pointed to DH Param but it’s a little move involved than that. Please view my friend and fellow CTP Anton Van Pelt’s updated post here for more info: https://www.antonvanpelt.com/make-your-netscaler-ssl-vips-more-secure-updated/.
19. Now setup a Load balancing Method and Persistence. You can use Least Connection for the method and Cookie Insert with Source IP for the backup under Persistence. I like to set the Cookie Insert timeout to 0 so it causes minimal overhead on the NetScaler. You can use whatever you need for environment, this is what I just happened to use here for my method and persistence:
20. And now your vserver should be up and ready to accept traffic!

21. Now make sure your DNS is pointed at this new vserver IP and try and hit the WOPI URL in a browser over SSL:
https://oos.yourdomain.com/hosting/discovery
You should see the XML again like before which means everything is working!
Adding OOS to your ShareFile SZC
22. Now you’re ready to configure the ShareFile StorageZone Controllers. Go to one of your servers and open up the ShareFile Configuration web page. Login with your admin credentials:

23. If you scroll down a bit you’ll get to the StorageZones section. The “Configure Office Web Apps previews” section will be greyed out and you can’t select it. Yes even with the latest SZC 4.0 it still refers to it as Office Web Apps instead of Office Online Server. I’m sure it will get re-named in the next update and I’ve sent some feedback to the ShareFile product team about this:

24. Scroll down to the very bottom of the page and click Modify:

26. Once checked it will expand out and give you the option to enter your URL. Type in the OOS URL you created before that goes to your NetScaler vserver:
27. Scroll to the bottom and hit Save:

28. Now go to the Monitoring tab and “Microsoft Office Web Apps Server Connectivity” should have a green check mark and say OK:

29. Now you’re ready to test! Login to ShareFile and try hovering over the magnifying glass next to a Word doc and a preview should appear. When you click on it it should render via OOS like I showed in the introduction to this article.
Final Thoughts
I’ve shown your how to integrate Office Online Server with Citrix ShareFile using Citrix NetScaler to enable the connectivity, optimize the traffic, and keep it all secure. All this with documents that reside in your datacenter in a local StorageZone. If you’ve been keeping up with the announcements made at Synergy this year, ShareFile will have a lot more integration with other services. Lots of exciting features coming! If you have any questions or need help please leave a comment below.
Jason Samuel is a visionary product leader and trusted advisor with a proven track record of shaping strategy and driving technology innovation. With extensive expertise in enterprise end-user computing, security, cloud, automation, and virtualization technologies, Jason has become a globally recognized authority in the IT industry. His career spans consulting for hundreds of Fortune 500 enterprises across diverse business sectors worldwide, delivering cutting-edge digital solutions from Citrix, Microsoft, VMware, Amazon, Google, and NVIDIA that seamlessly balance security with exceptional user experiences.
Jason’s leadership is amplified by his dedication to knowledge-sharing as an author, speaker, podcaster, and mentor within the global IT and technology community. Recognized with numerous prestigious awards, Jason’s contributions underscore his commitment to advancing technology and empowering organizations to achieve transformative results. Follow him on LinkedIn.
Disclaimer: Views expressed here are his own and do not reflect the views of his employer, past or present, or any organizations he is affiliated with. Content is for informational or personal purposes only.





Chris
August 18, 2017 at 7:51 AM
This was an excellent article. But I am still stuck with OWA farm reporting as unhealthy, and Sharefile Monitoring page says “Cannot connect to Microsoft Office Web Apps Server”.
registered case with Citrix but they are not replying. Our Multi Tenant enviroment is suffering because of this.
any tips?
Francis Czekalski
October 27, 2018 at 8:34 AM
This Saved my life I am still having some issues with VIEW ONLY but this article was better than any Citric DOC… Also if you are like me and have an outbound proxy you need to deal with there are two more steps
use the set-officewebappsfarm -proy “http://FQDN” and set proxy rule for SSL bypass …