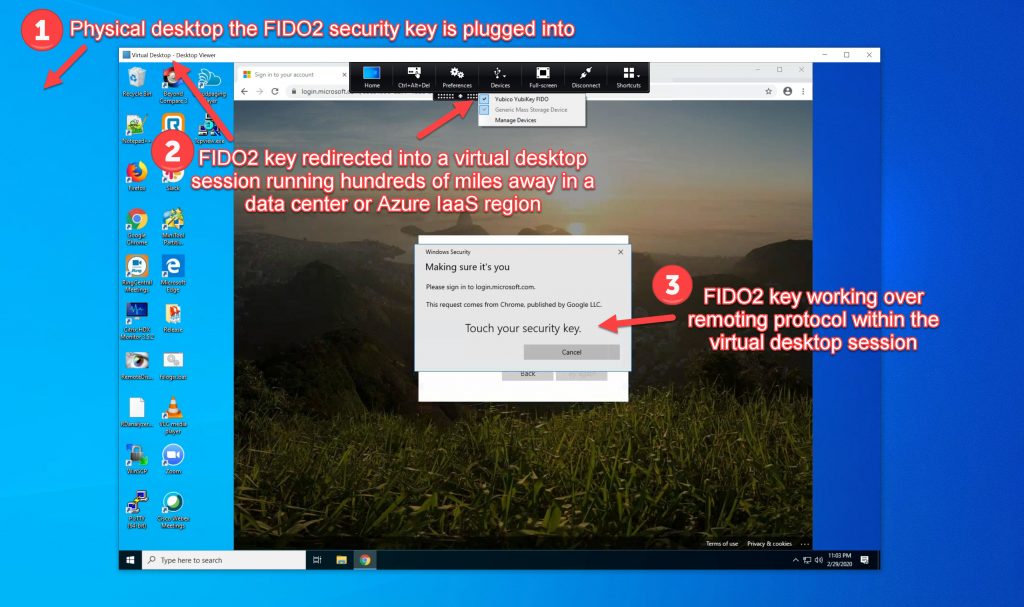
You can use FIDO2 hardware security keys plugged into your physical desktop over the Citrix HDX remoting protocol for use with virtualized Windows Desktop and Server OSes that can be hundreds of miles away running in your data center or cloud tenant (Azure IaaS). There are many use cases for FIDO2 keys used over a remoting protocol:
- You want to use FIDO2 hardware security keys within the virtual desktop or virtual app session with Azure AD protected web apps
- You want to register a new FIDO2 hardware security key with the Microsoft Security info page (https://myprofile.microsoft.com/ then click Security info > which takes you to the https://mysignins.microsoft.com/security-info page) over a secure company controlled virtual desktop session instead of your unmanaged BYO device for the FIDO2 onboarding experience
- You want to use another convenient Azure AD compatible passwordless authentication method like Microsoft Authenticator phone sign-in for regular launches of your virtual desktop and then use a FIDO2 hardware security key as a form of step-up authentication to highly sensitive apps that are accessed within the virtual desktop session
Fellow FIDO2 enthusiast Ben Splittgerber and I started discussing this on Twitter back in November 2019 and posted about our successes redirecting various FIDO2 keys including multi-protocol FIDO2 keys such as the YubiKey 5 NFC. Since then I’ve received a lot of questions from Microsoft, Citrix, and FIDO2 key manufacturer employees on this technique so I thought I’d do a writeup to benefit everyone and the community.
Pre-reqs:
- Citrix VDA installed on any of these OSes I have tested so far:
- Windows Server 2016
- Windows Server 2019
- Windows 10 Enterprise
- Windows 10 Enterprise multi-session in Azure (part of your Microsoft WVD entitlement)
- You must use a modern web browser that supports WebAuthn (and therefore FIDO2) within this OS you have the VDA installed on. FIDO2 is only supported on modern web browsers so if you want to use your key in-session, the session must have a modern web browser available. I have covered this in past articles down to specific version numbers of each web browser. There is a website tracking this capability at https://caniuse.com/#search=webauthn. Just use the latest version of any of these and you will be fine:
- Chrome
- Edge
- Edge Chromium
- Firefox
DO NOT use IE 11. IE 11 is not a modern web browser and will never support WebAuthn (a core component of FIDO2), it is a deprecated web browser. It’s 2020, there are several secure browser solutions for your legacy web apps now so there is no reason to use IE 11 in an enterprise. Microsoft even has the App Assure service that will fix your legacy web apps for FREE so they work with Edge and you don’t have to use IE 11 anymore.
- A FIDO2 hardware security key that uses USB. You will be using the USB redirection feature of the Citrix HDX remoting protocol to use the key in-session. I have not tested NFC USB readers and if they redirect when used with the NFC capability of some FIDO2 keys. I have also not tested BLE FIDO2 keys as I’m not aware of any way to redirect that. The good majority of FIDO2 hardware security keys out there are USB so this USB redirection should work great for most deployments.
- The Citrix HDX USB redirection feature can also allow or disallow certain HID (Human Interface Devices) that can be redirected within the HDX session for security reasons. This is good because it helps you control who can use this FIDO2 redirection capability within your company targetted by security group or delivery group if you wish. Also, note that a FIDO2 key is not a USB Mass Storage device so there is no security issue redirecting a FIDO2 key just in case your company has a policy that USB storage devices are not to be redirected.
- Allowing or disallowing a FIDO2 key requires you to know the VID (vendor ID) and PID (product ID) of the key that is unique to each manufacturer and model of the key. For example, Yubico lists their VID and PID values for all their keys here depending on what interfaces have been enabled on the key: https://support.yubico.com/support/solutions/articles/15000028104-yubikey-usb-id-values. Some FIDO2 key manufacturers may not document this but you can get these values easily from Windows Device Manager or within the Citrix Workspace app after inserting your key which I will show you later.
- Some multi-protocol FIDO2 keys are blocked by the default HDX USB redirection settings at the VDA level and require some additional steps and considerations I will cover.
How to use your FIDO2 key over a remoting protocol:
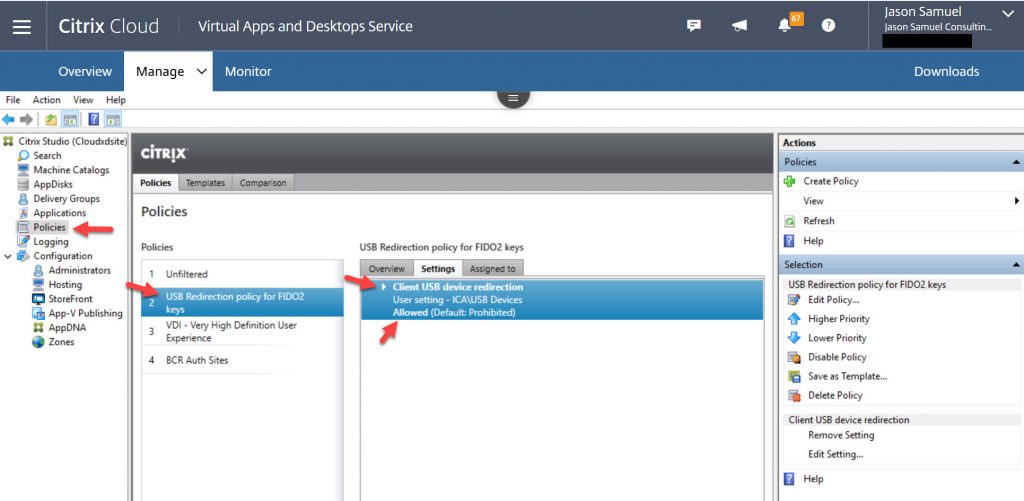
1. The Citrix HDX remoting protocol is a very secure protocol composed of ICA virtual channels. Many of these virtual channels are used to redirect components from a physical machine the user is using as a client device into the remoting session (virtual desktop or virtual app). USB printers, smart card readers, and some other peripherals that have dedicated virtual channels are mapped into the session by default. However, USB redirection capability for other devices like USB flash drives are disabled by default. FIDO2 keys fall under this category as there is no specialized virtual channel for FIDO2 keys at this time. The Citrix engineer must enable USB redirection for these other “generic” USB peripherals such as FIDO2 keys. Go to Citrix Studio > Policies > and create a new policy named whatever you like and assigned to whatever security group or delivery groups you like. Set the “Client USB device redirection” policy to Allowed:
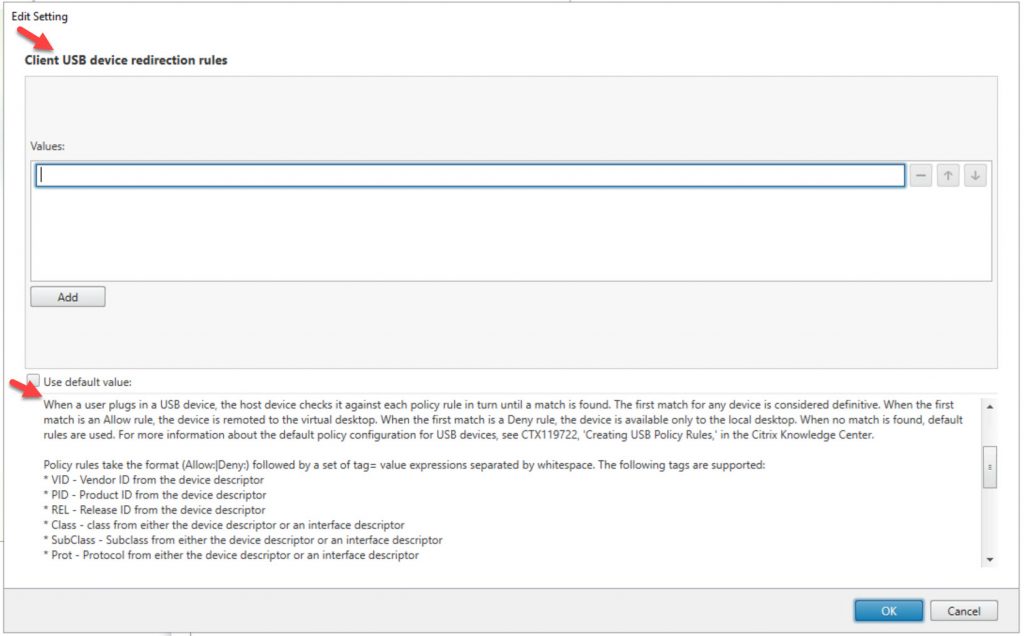
2. DO NOT use only this policy and walk away. You just opened up everything for USB redirection if you do this including USB flash drives which can be a big security concern. Look carefully at this setting and you will notice the related setting of “Client USB device redirection rules” which is how you lock down USB redirection to just certain peripherals only.
3. My recommendation is to only allow the VIDs (Vendor IDs) of FIDO2 manufacturers here and then a deny for everything else as your last rule. Ideally, it would be nice to add a Class for simplicity but I am not aware of one that covers all FIDO2 HID (human interface devices) at this time. As you scroll down in the description box for this policy setting you will get a great explanation of this as well as example values. For the moment, I will leave this policy blank and continue onward to the next steps just to show you how everything works with no rules applied at all (i.e. wide open to all USB devices). I will show you an example policy to lock it down in a further step:
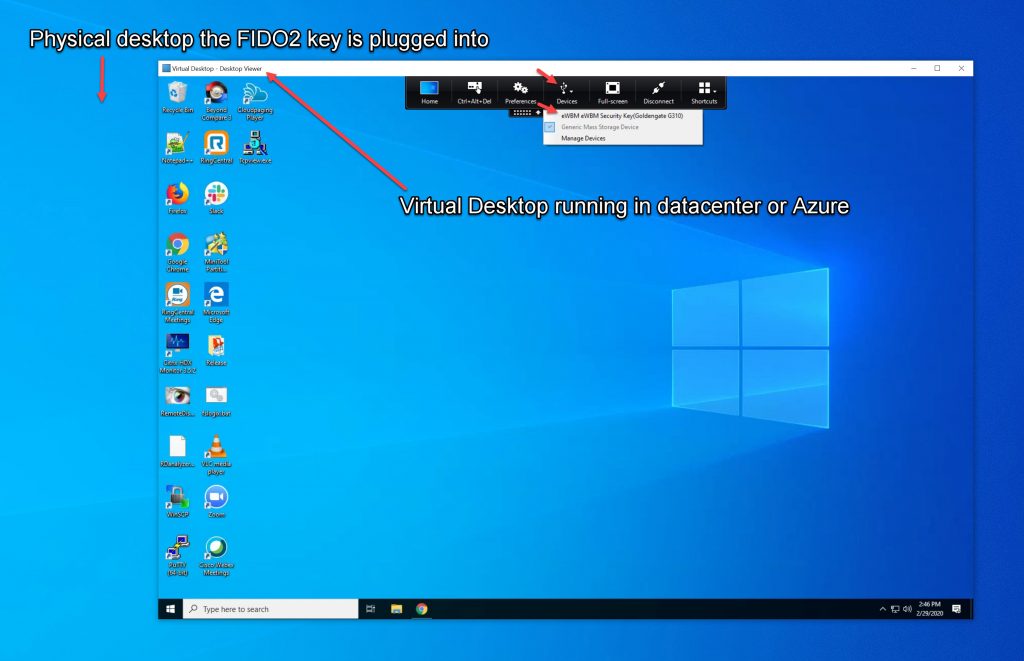
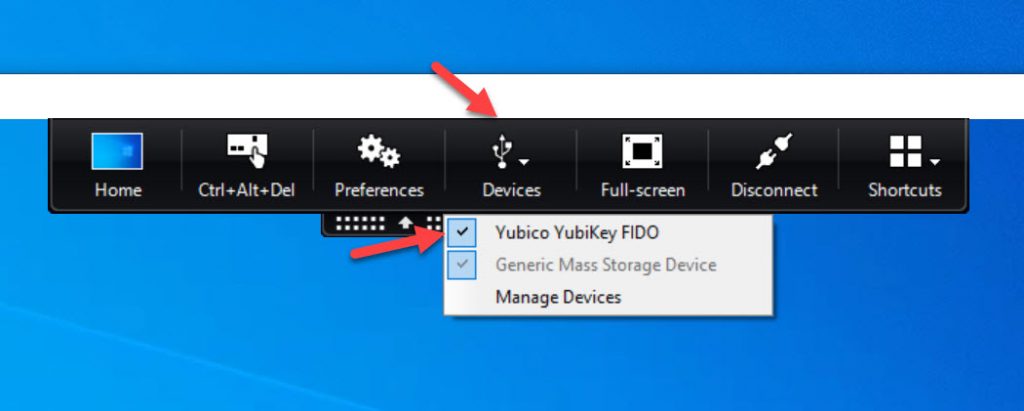
4. Ensure your VDAs have received the USB redirection policy you defined in step 3. Then use Citrix Workspace to launch a Windows virtual desktop session. In this example, I have logged in using Microsoft Authenticator password-less phone sign-in with Citrix Workspace and have launched a Windows 10 virtual desktop just to prove that I can use one passwordless authentication method first to launch, and then the FIDO2 key for passwordless authentication purposes to other resources separately within the session itself. I am using an eWBM Goldengate G310 biometric FIDO2 key in this example which works great with Citrix USB redirection as-is since it’s a single protocol key and passes as a “FIDO2 HID” only. I have inserted the FIDO2 key into the physical desktop and in the Desktop Viewer, I can see the key and just need to click on it to begin redirection into the virtual desktop session:
5. You will then hear the familiar USB plugin sound and the check will appear next to the FIDO2 key. If it does not have a check next to it just click on it to start redirection. I can now use the key within the session with any modern web browser that is available in the session:
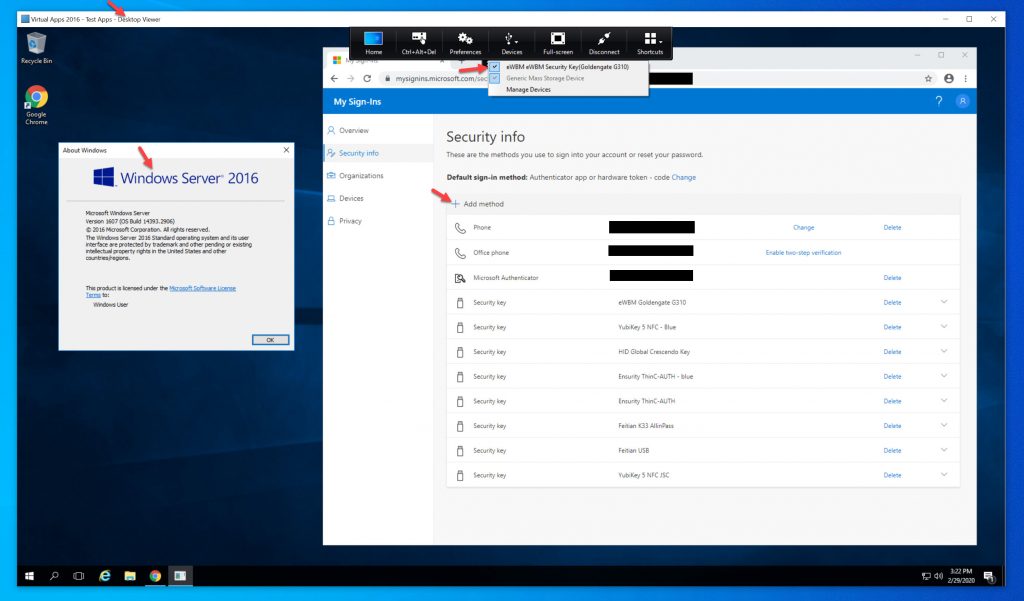
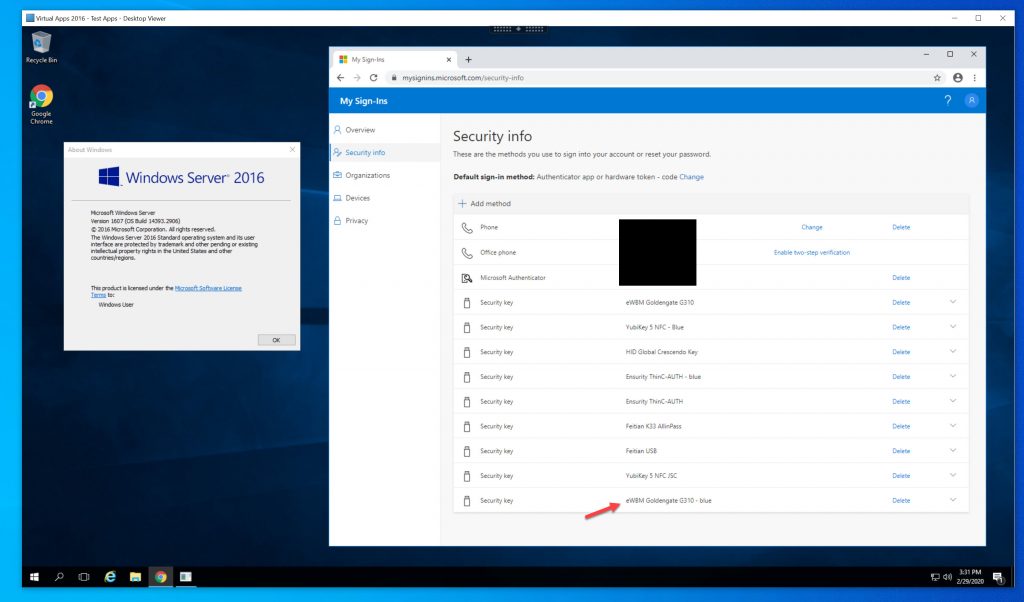
6. Now I will launch an older Windows Server 2016 full desktop session just to show that even older legacy Server OSes can be used the same way. I now wish to enroll a brand new FIDO2 security key against the Microsoft Azure AD Security info page. I open up Chrome which is installed on this server and navigate to https://myprofile.microsoft.com/ > then click Security info > which takes you to the https://mysignins.microsoft.com/security-info Security info page where I can register my authentication methods. I actually have 2 of the Goldengate keys and as you can see one is already registered near the top of this list. I will add my new second Goldengate key by clicking “Add method”:
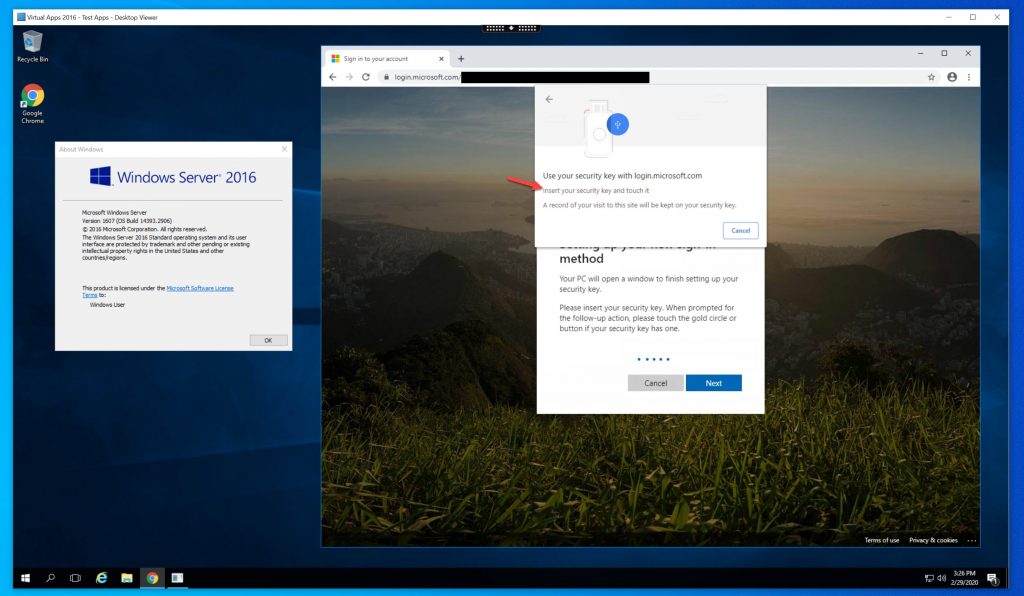
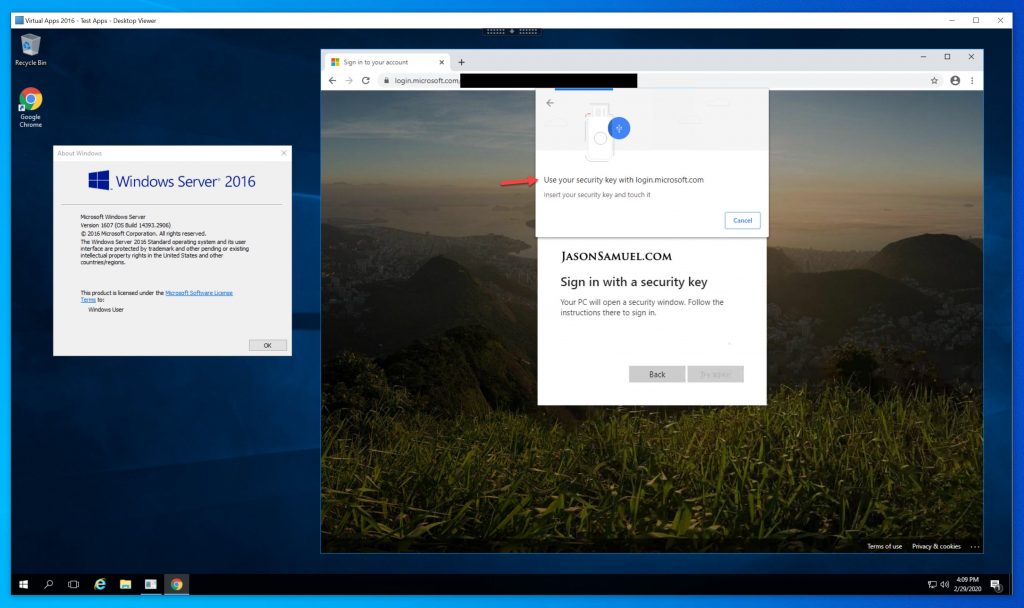
7. Now I will go through the typical FIDO2 onboarding flow. I have shown this in previous articles in detail so I won’t bore you with all the screenshots. When you get to the login.microsoft.com page and are asked to insert and complete your gesture (touch the key), all you need to do is touch it to proceed just as you would if you were enrolling the key on a physical desktop:
Since this is a biometric key I am using, I just put my finger on it so it can scan my fingerprint at this point. The key has been activated and changed from its usual green LED to the blue flashing LED awaiting my gesture/action.
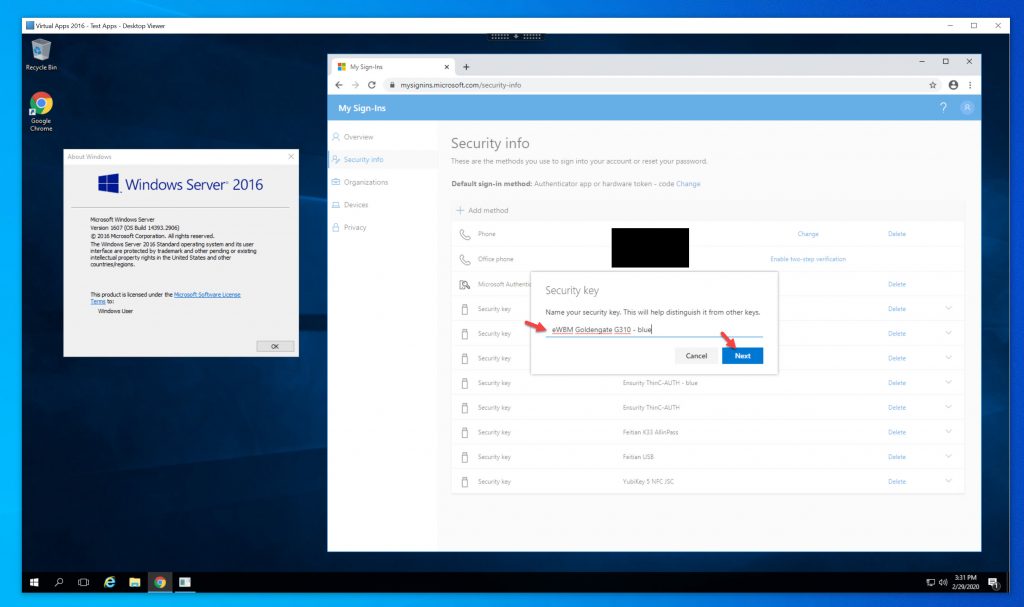
8. Name the key. I have a tiny piece of blue 3M painter’s tape on the back of this key to visually identify it as different from my other identical model key so that is why I am naming it “blue” here:
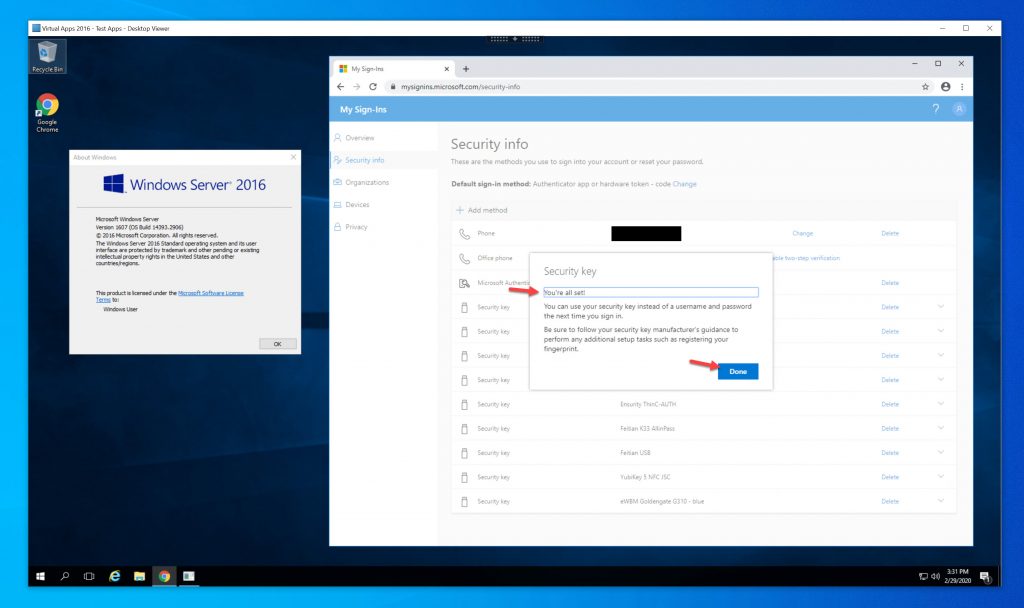
9. You’re all set! Hit Done:
10. And there it is successfully registered with Azure AD at the bottom of my long list of FIDO2 keys:
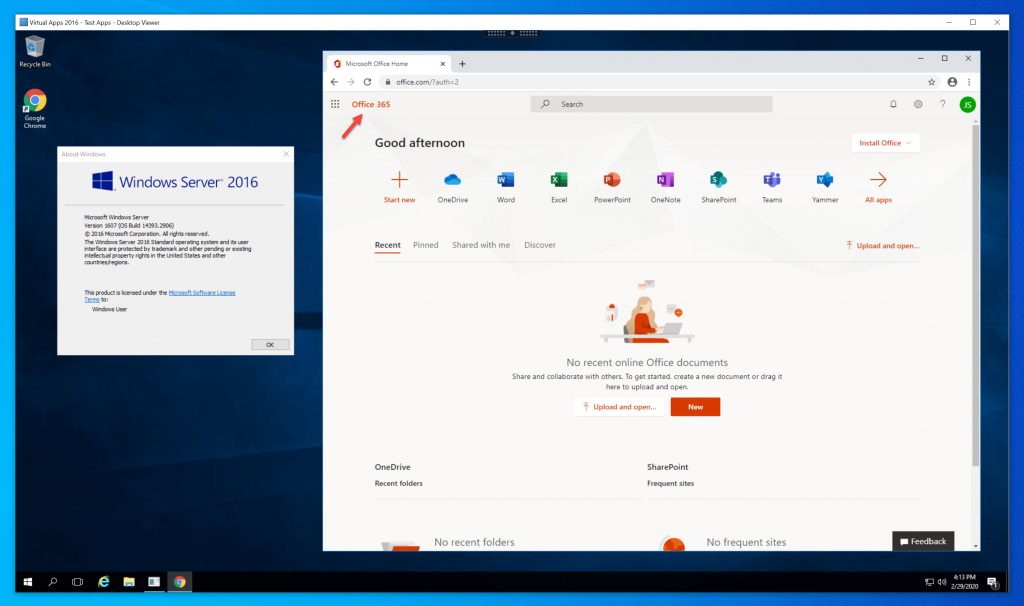
11. I can now use the FIDO2 key in the remoting session with any Azure AD protected SaaS apps like Office 365 for example. Even on this legacy Server 2016 operating system:
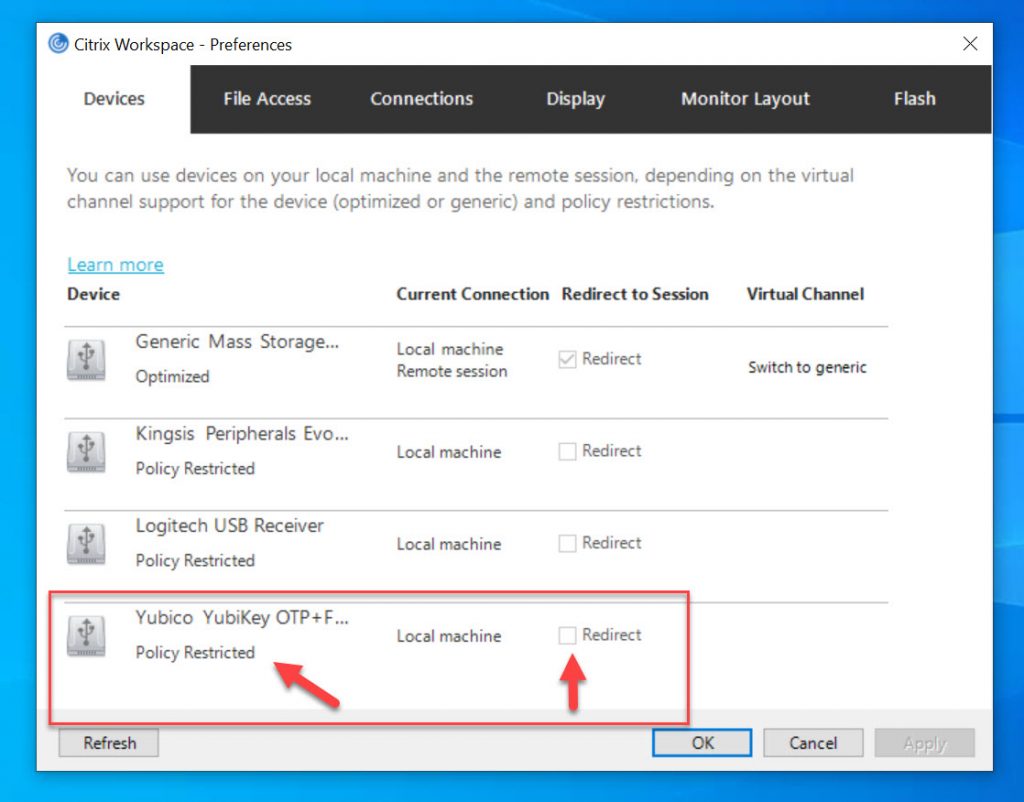
12. Now I will show you how to redirect a more complicated multi-protocol FIDO2 key such as the YubiKey 5 NFC. It is going to be blocked by the default HDX USB redirection policy. This particular key will show up as “CCID Smart Card” and “HID Keyboard” and not just the expected “FIDO2 HID Device”. Check Windows Device Manager and you’ll see what I mean. The key is being detected as a keyboard and smart card, which is disabled from USB redirection default rules on the VDA due to having dedicated optimized virtual channels for these. For this reason, the whole key will get blocked from USB redirection by default. You will notice that the YubiKey is missing in Desktop Viewer. Click the Manage Devices option:
13. You will notice that the YubiKey says “Policy Restricted” and the option to redirect is greyed out just like my mouse and keyboard are:
14. If you hover your mouse over the name of any of these devices for a few seconds, you will get a pop-up with the detected VID and PID values. This is convenient so you don’t have to go to Windows Device Manager on your client machine and hunt it down there. Also, notice the YubiKey is identifying itself with all its functions enabled as “YubiKey OTP+FIDO+CCID”:
15. This is the root of your problem and the easy solution is to simply disable these unused protocols on the YubiKey. It’s a bit tedious for larger deployments, but you can instruct your users to download YubiKey Manager and disable this functionality under the Interfaces tab. For larger organizations I am hoping the upcoming YubiEnterprise Services may be able to disable unnecessary protocols for you as part of the procurement process:
16. Even if you disable all the USB interface settings except FIDO2 and PIV which are 2 of the more popular reasons for a multi-protocol key, you will notice it will still be restricted from redirecting but the key now identifies as “YubiKey FIDO+CCID” with a 0406 PID value:
17. If you disable PIV and only allow FIDO2, then the key will immediately redirect properly just like other FIDO2 only keys. You can also leave FIDO U2F checked with no issue and I encourage that since many online web services still use the older FIDO U2F standard and you will want that “Universal 2nd Factor” capability while the world catches up to its successor FIDO2 passwordless standard. You will also notice that the key identifies itself as “YubiKey FIDO” and has a PID of 0402 when it’s configured this way:
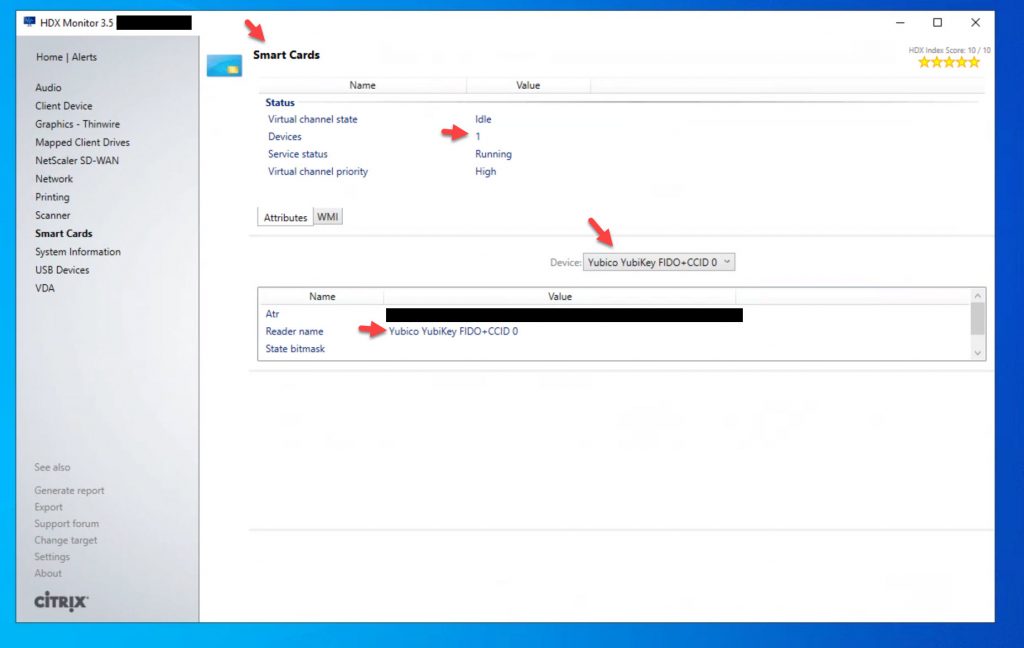
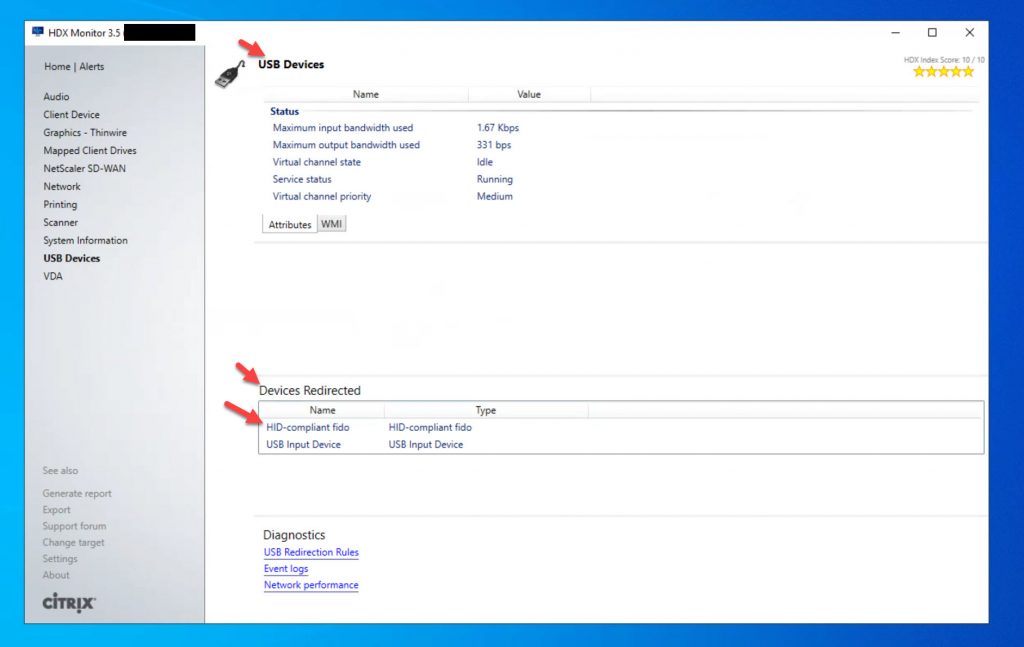
18. So let’s say you need both FIDO2 and PIV to work in your deployment which is the 0406 PID value as shown in step 16 above. If you enable both protocols on your key and edit your Client redirection policy to allow this, it will still not work. This is because USB Class Code “0Bh” and “03h “which denotes “smart card” and “keyboard” are disabled from redirection by default at the VDA level. Smart cards use their own virtual channel and should not be USB redirected which is why it’s set to disabled by default. And redirecting a keyboard may lead to some unpredictable results between physical and virtual desktop. I have not tested either of these override scenarios yet but if you do validate this, please post your results in the comments section. Notice if you use the HDX Monitor tool within your virtual desktop session, the FIDO2 key with PIV enabled is talking down the smart card virtual channel instead of the USB virtual channel which is part of the problem:
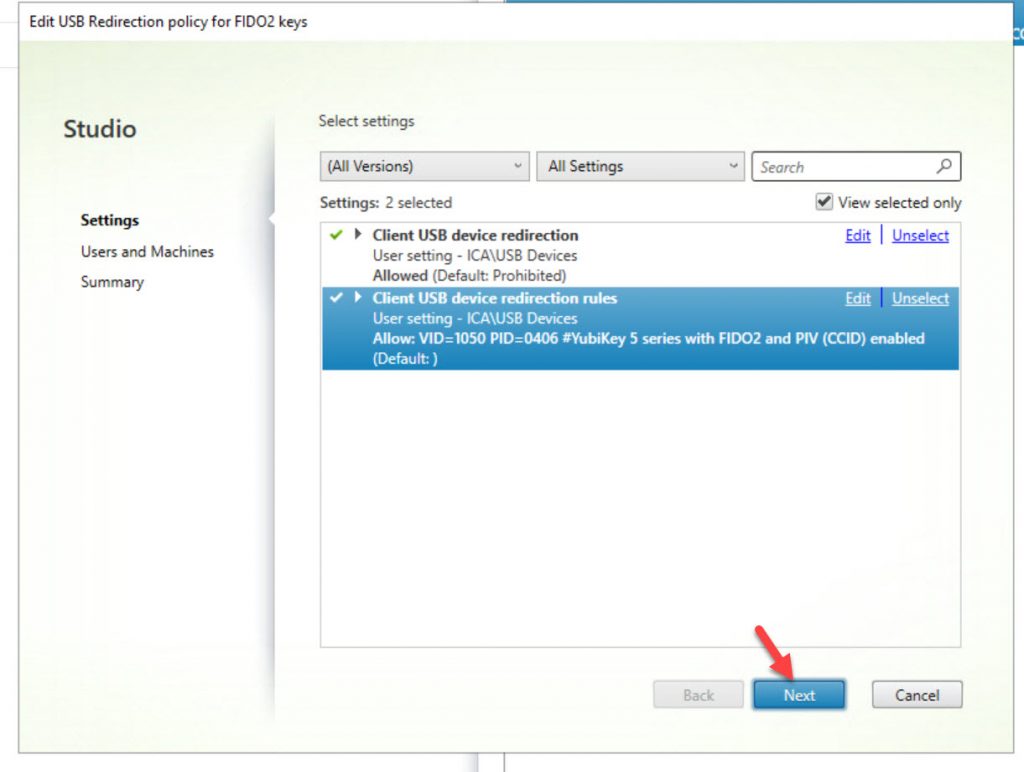
19. In this step I will show you how to set a Client USB device redirection rule policy to allow a specific key. Now, this step is not going to work with this FIDO+CCID enabled key so you can skip it or follow along and try it for a better understanding of the problem yourself. Go back to Citrix Studio and go to the “Client USB device redirection rules” setting of your HDX policy. I want to allow FIDO2 and CCID options of this key. So I will use the VID of “1050” denoting Yubico and PID of “0406” denoting “YubiKey FIDO+CCID” functionality. Again, this info is shown on Yubico’s website and in the Desktop Viewer. DO NOT use the “ox” part shown on Yubico’s website, only the numbers that follow after that which is what Desktop Viewer is showing in the screenshots above. Enter your policy like this:
|
1 |
Allow: VID=1050 PID=0406 #YubiKey 5 series with FIDO2 and PIV (CCID) enabled |
And you will only have the 2 policies defined like this:
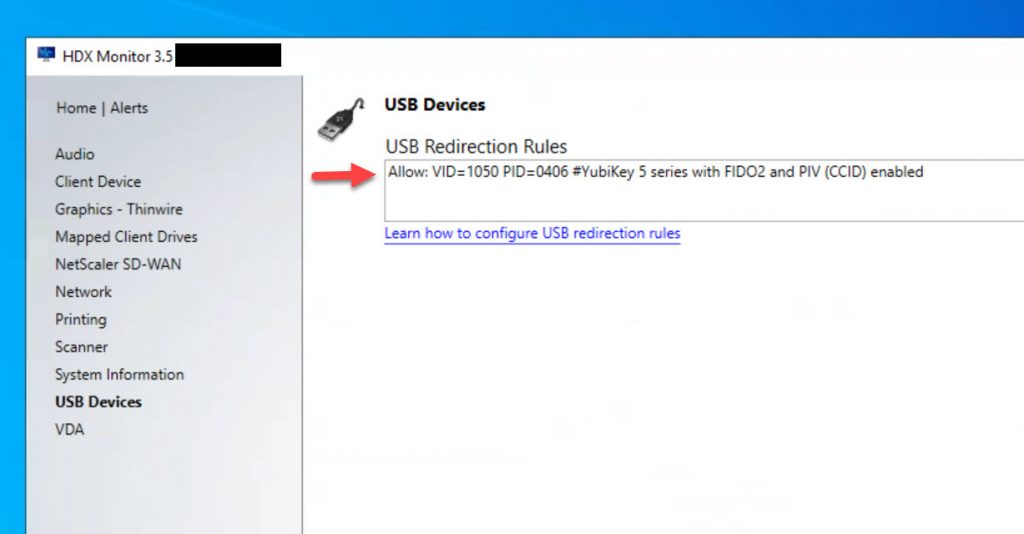
20. You can disconnect from the virtual desktop or virtual app session and relaunch to ensure it is getting the updated HDX policy. It may take some time depending on your environment even if you forced a policy update so you can just reboot the VM as a quick option. Once you have re-launched your session you will now notice the YubiKey 5 NFC key with FIDO2 and PIV enabled will still not redirect as I mentioned before. You can even verify with HDX Monitor the virtual desktop is getting the USB Redirection Rule you have set in Citrix Studio:
21. Again, this is because of the way the key is identifying itself as a keyboard and smartcard which is disabled from redirection at the VDA level by default. There is a way to redirect them but overriding this default can lead to several unexpected behaviors with true keyboards and smart cards with your HDX session so I do not recommend pursuing this. It is better to simply disable unused protocols on your FIDO2 keys if possible. You can delete the USB Redirection Rule for FIDO2 + PIV I showed above if you followed along. Then just enable FIDO2 and FIDO U2F on your key like this:
This will redirect perfectly into the session going forward with that key:
You can verify with HDX Monitor it is talking down the USB virtual channel as it should this way:
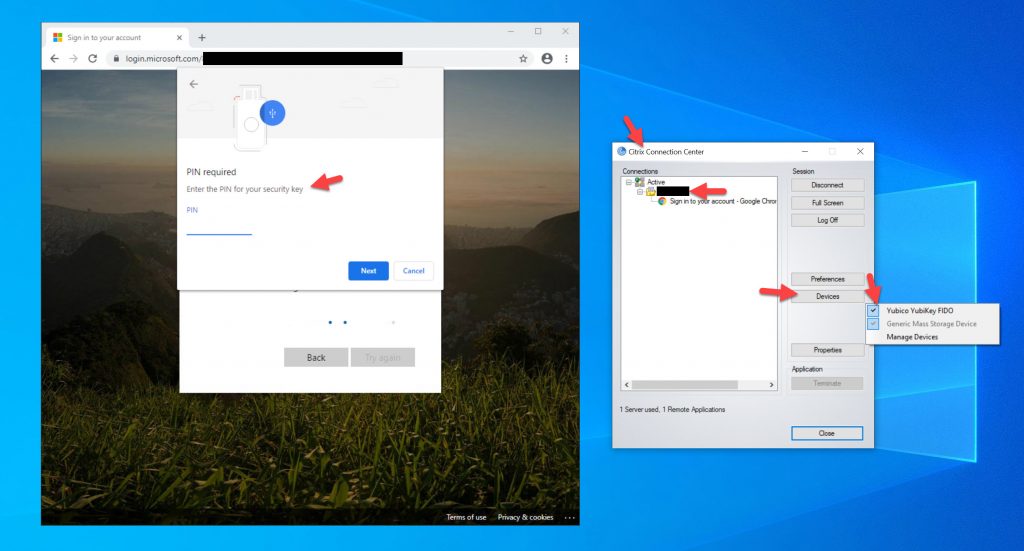
If you choose to use Virtual Apps (XenApp) and just publish a browser only and not the full desktop of the Server OS, you need to use Citrix Connection Center (part of the Citrix Workspace app) to redirect the key into the session like this since there is no Desktop Viewer:
22. Also note that occasionally after using the current YubiKey Manager 1.1.4 to disable a USB interface, it will not detect the key again and keeps telling you to insert it. This is a bug I’ve noticed across multiple machines I’ve tried this on since I tried all sorts of settings over several hours. Probably more so than most end users would. The key still works fine and is not the issue if you see this error message. Don’t worry, you didn’t brick it as I originally thought and panicked for a few minutes the first time this happened. Even after a reboot, the YubiKey Manager will show this error message:
“Failed connecting to the YubiKey. Make sure the application has the required permissions.”
If you uninstall and re-install YubiKey Manager it will start working again. I’m sure this will be resolved by Yubico in a future version of the software but just something to keep in mind if you come across this error message. No reason to panic. 🙂
23. As the last step, you need to lock down your Client USB device redirection rules policy setting we had referenced in step 3 above and had left open temporarily. Policies are case-sensitive so ensure you enter values correctly. In this example, I want to allow all my FIDO2 keys to be redirected and block all other USB devices:
|
1 2 3 4 5 6 |
Allow: VID=3089 # FIDO2 keys - Ensurity Allow: VID=311F # FIDO2 keys - eWBM Allow: VID=096E # FIDO2 keys - Feitian Allow: VID=09C3 # FIDO2 keys - HID Global Allow: VID=1050 # FIDO2 keys - Yubico DENY: |
I hope this guide helps with your FIDO2 USB redirection needs with the Citrix HDX protocol and Azure AD. If you have any questions or comments please leave them below.
UPDATE: The Citrix HDX WebAuthn optimized virtual channel has been released. It is recommended to use this virtual channel instead of USB redirection policy. More info here: https://www.jasonsamuel.com/2020/11/11/a-deep-dive-into-the-citrix-hdx-fido2-and-windows-hello-optimized-virtual-channel-with-virtual-desktops-and-apps-using-usb-nfc-ble-and-built-in-authenticators/
Jason Samuel is a visionary product leader and trusted advisor with a proven track record of shaping strategy and driving technology innovation. With extensive expertise in enterprise end-user computing, security, cloud, automation, and virtualization technologies, Jason has become a globally recognized authority in the IT industry. His career spans consulting for hundreds of Fortune 500 enterprises across diverse business sectors worldwide, delivering cutting-edge digital solutions from Citrix, Microsoft, VMware, Amazon, Google, and NVIDIA that seamlessly balance security with exceptional user experiences.
Jason’s leadership is amplified by his dedication to knowledge-sharing as an author, speaker, podcaster, and mentor within the global IT and technology community. Recognized with numerous prestigious awards, Jason’s contributions underscore his commitment to advancing technology and empowering organizations to achieve transformative results. Follow him on LinkedIn.
Disclaimer: Views expressed here are his own and do not reflect the views of his employer, past or present, or any organizations he is affiliated with. Content is for informational or personal purposes only.














Ritchie
January 20, 2022 at 9:17 AM
What is the path forward in the event PIV is required?