DDoS and brute force attacks are constantly evolving and becoming more widespread. It’s not just high profile websites like financial institutions and e-commerce sites that get attacked anymore. Any organization can be a target in a matter of minutes. A few sample scenarios could be there’s a press release about a new product your company is releasing so they use a DDoS smoke screen to gain entry into your network to cover data theft. Or your whole industry is getting the attention of the media and you’re one of the top companies in that industry so whichever groups takes you down will be in the spotlight. Or your CEO does something notable and is in the news and so anything associated with him will be in the news including an attack against his company. Or unfavorable legislation passes for your industry and public opinion is low, ripe pickings for hacktivists. Or the attacker just plain felt like attacking an entire group of sites to test out a botnet and yours just happened to be one of them. The possibilities are endless so don’t think you will never be targeted because nothing has happened in the past. Check out http://www.digitalattackmap.com/ for a live view of global DDoS traffic. You should be able to confidently say you have a mitigation plan to keep one of these attacks at bay.
There are several things you can do to protect your Citrix Netscaler Gateway (Access Gateway) from DDoS/DoS and brute force attacks. First off, DDoS protection should be in front of the Netscaler in my opinion. In front of the firewall even. Look into DDoS protection from your ISP if they offer it or an onsite solution that sits in front of the firewall like appliances from Corero or Arbor Networks. You can even protect the ISP router if you like with some of these solutions. There are also DDoS mitigation/scrubbing services like Prolexic (now part of Akamai) or CloudFlare you can look into.
It’s not just traditional SYN flood attacks at the network level you have to worry about anymore. There are reflection\amplification attacks utilizing DNS, NTP, etc. There are fragmented packet attacks causing your appliances to wait around needlessly for missing packets, there are application layer attacks against your web server or app itself, and there are the worst kind which is specialty crafted packet attacks against the appliance or back end server OS itself. There’s always something new around the corner which is why you really need a dedicated on-site appliance or external service to help analyze and mitigate any and all attacks including 0 day attacks. You want to be pro-actively alerted to and remain vigilant against attacks, not scrambling during and after the attack.
HOW YOUR CITRIX NETSCALER CAN HELP
Even if you implement all these layers in front of your Netscaler, there are a few things you should configure on the Netscaler itself for an extra layer of security. Netscalers are very powerful devices can can help defend against regular DoS and to some degree DDoS attacks very well. You’ll need a Platinum level device for the full set of security features such as DoS shield, Day Zero attack prevention/Application Firewall, etc. You have the capability to do the following:
1. Application layer defense (Layer 7 defense) – like Slow Read, Slow HTTP POST (RUDY), Slow HTTP Headers (slowloris), HTTP Flood, Random Searches, Apache Range Header, etc. that cause resource starvation on the web servers (not usually a volumetric attack)
- Application protocol validation (enforcing RFCs thus dropping malformed packets and the ability to create your own validation using Content Filtering or Responder policies)
- Surge protection/priority queuing (presents traffic to backend servers based on their current capacity while rest gets queued until resources free up. priority queuing can weight certain kinds of requests providing them preference in processing)
- HTTP flood protection (HTTP GETs are challenged)
- HTTP low-bandwidth attack protection (monitoring for excess slow connections and proactively reaping)
2. Transport layer defense (Layer 4 defense) – like SYN floods, DNS query floods, SMURF, SSL floods, etc. to starve bandwidth on the web servers by using up sockets (volumetric attack)
- Full-proxy architecture (nothing in without an explicit policy you set)
- High performance design (low latency processing, purpose built HTTP parsing engine, hardware accelerators)
- Intelligent memory handling (memory isn’t allocated until connection is validated)
- Extensive DNS protection (running either DNS proxy or authoritative modes protects you with DNS specific validation, rate limiting, etc).
3. Network layer defense (Layer 3 defense) – DNS amplification, IMCP floods, UDP floods, teardrop, fraggle, christmas tree, etc. to starve bandwidth on network devices (volumetric attack)
- Embedded defenses (SYN cookies)
- Default deny security model (dropping invalid packets that are not defined in your policies)
- Protocol validation, rate limiting (can be done using AppExpert/Responder policies)
Once you have your stack of DoS/DDoS protection in place, test it. During a maintenance window, attack your own network (please let your Network/Security/IT Management teams, etc. know what you’re doing ahead of time). See how your defenses behave. There’s no point in putting up a giant expensive wall against a flood if it has cracks in it. See what your limits are. Download LOIC, Slowloris, Hping3, HOIC, Kali, etc. and let them loose. If you don’t want to do it yourself, there are tons of vulnerability and penetration testing firms out there that can help you. Make sure there are members of your team that are getting IT-ISAC, FS-ISAC, US-CERT, etc. notifications and actively engaging peers in your business sector to see what they have come across. Ensure your organization has an incident response plan specifically for DDoS attacks.
WHAT YOU SHOULD CONFIGURE ON YOUR CITRIX NETSCALER
Now let’s get into the technical stuff. So how do you enable defenses on the Citrix Netscaler? Specifically around the Netscaler Gateway (Access Gateway)?
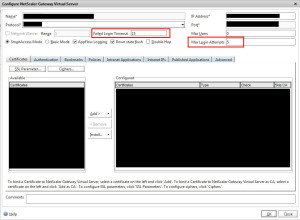
1. Configure Max Login Attempts & Failed Login Timeout – This can be done globally on the Netscaler Gateway (Access Gateway) but I prefer to do it on the Netscaler Gateway vServer itself. Go to Netscaler Gateway > Virtual Servers > double click your virtual server, and select the number of attempts and timeout. You should set the number of attempts to just 1 attempt below what your AD account lockout policy is set to so that user accounts are protected from being locked out in AD, let the Netscaler do the lockout for you. In this example I have 5 attempts and a 15 minute timeout set in a scenario where my AD account lockout policy is set to 6 failed login attempts:
If a user calls the help desk frantically saying they need to login and the help desk sees their account is not locked out but resets their AD password, they will still need to wait 15 min before attempting to login again on the Netscaler Gateway because it is still locked out there. There was no way for you to be able to “clear” their user ID for them from the Netscaler GUI. I’ve been asking for this feature for sometime and with the 10.5 firmware release yesterday, this is may now be possible (I haven’t had a chance to test it yet though): http://support.citrix.com/proddocs/topic/ns-rn-main-release-10-5-map/netscaler-10-5-rn.html#netscaler-10-5-rn__netscaler-10-5-50-x-mr-enhs
Also note, this is all keyed off the user ID, not client IP. If you type “jsmith” for the user ID and try 5 different incorrect passwords, you will get the max login attempts message. But if you try “jsmith”, “jdoe”, “jlee”, etc. it won’t trigger the max login attempts. Also if they just type a user ID and no password, it won’t trigger a login attempt either. I would like to see this changed where any click of the “Log On” button is considered a logon attempt instead and have submitted a feature request for this. My concern is that if an attacker has a list of user IDs (easily guessed or extrapolated), then can sit there and nail the Netscaler Gateway attempting to brute force the password causing an Active Directory account lock out. The help desk gets a call from the user, they unlock the account, and immediately it gets locked again because of the attacker. How’s the user supposed to work if their account keeps getting locked out? As a work around, you can create a responder policy that looks for the POST from the Logon button being clicked to mitigate this threat. Look for a POST going to https://yourdomain.com/cgi/login to help build your policy.
2. Rate limiting – Prevents an attacker from brute forcing the login page. If they hammer the page too many times, the Netscaler will drop the packet. In this example I’m going to configure a Responder policy to drop packets if they exceed more that 4 page requests in 10 seconds.
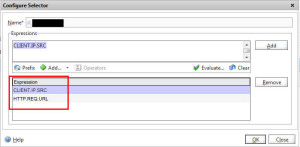
-Go to AppExpert > Rate Limiting > Selectors and create a new selector with these two expressions:
CLIENT.IP.SRC
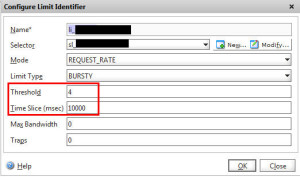
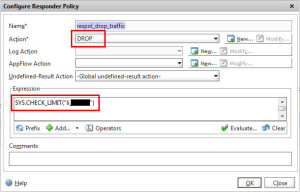
so your Selector should look like this with them stacked on top of each other: -Now create a Limit Identifier that references the Selector. For the sake of testing, I have set it to 4 requests within a 10 second period. Please don’t use this in production because the time slice is way too high. This is just so we can test easily: -Now create a Responder Action if you intend to redirect the user. In this example I want to drop traffic so you don’t need a Responder Action for this. It can be done on the Responder Policy itself. So go ahead and create a Responder Policy like this with an Action of DROP and the Expression to check for the Limit Selector you created before:
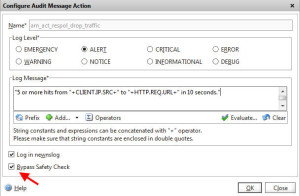
-If you do syslogging (I hope you are – see http://www.jasonsamuel.com/2014/05/28/best-practices-for-citrix-netscaler-aaa-logging-and-retention/), you can create a log action here so you can be notified in the event of a brute force or DoS attack. Just create a new Log Action like this on your Responder Policy. I like to log it to the newnslog as well. You will need to bypass the safety check to get it to apply or it will warn you it’s unsafe:
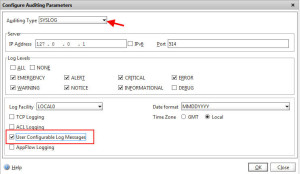
You’ll also need to go to System > Auditing > Settings > Change global auditing settings > check the “User Configurable Log Messages” box for both SYSLOG and NSLOG auditing types. Otherwise you’ll see hits on your Responder policy but no hits on your Auditing Message Action policy: Once done, refresh your Netscaler Gateway login page time 5 times. On the 5th time it should start dropping. Use the HTTPFox FireFox add-on to watch it if you like. You should also be able to go to your Responder Policy and watch the hit count rise. Don’t forget to adjust your threshold and time slice to something more realistic after your testing is done.
You can view your Responder policy hits from the CLI by using:
and Message Action hits by using:
or and to view the actual message:
If you chose to not write to the newnslog and are instead writing to the ns.log, you can use:
Just don’t forget about the 7 second delay before the hits appear in your Putty window. One thing to note, remember the AOL days in the 90’s? Every user was behind the same proxied IP address. Blocking an IP would block pretty much all AOL users. This changed in 2006 but even Wikipedia had trouble blocking malicious AOL users before then: https://en.wikipedia.org/wiki/Wikipedia:AOL. If you do business with another large organization and they are coming through a proxied IP, they could potentially trigger the rate limiting if the time slice is too large and several users tried to login at once. You would unintentionally block legitimate traffic. So keep an eye on this. The syslog email alerts will help you out big time to detect this and make adjustments as necessary before your service is impacted.
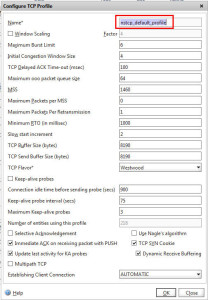
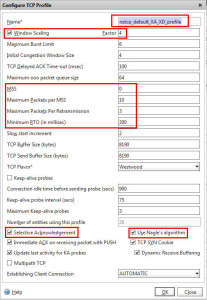
3. TCP optimizations – I’ve Tweeted about this before. You should be using the “nstcp_default_XA_XD_profile” on your Netscaler Gateway (Access Gateway) virtual server. This has optimizations in it designed around XenApp and XenDesktop. ICA traffic is a lot of tiny packets so a lot of back and forth communication. This TCP profile speeds up ICA transmission by cramming more packets into each transmission. There are 3 very good blog articles from Citrix by Abhilash Verma covering tuning the TCP stack using profiles:
http://blogs.citrix.com/2012/03/22/tune-netscaler-tcp-stack-to-suit-your-needs/ http://blogs.citrix.com/2012/03/29/create-your-own-tcp-optimization-profile-on-netscaler/
http://blogs.citrix.com/2012/08/02/get-best-tcp-performance-for-xenapp-xendesktop-deployments/
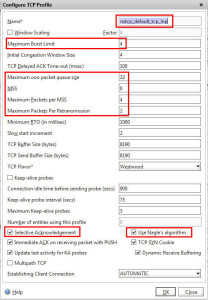
Now the “Nstcp_default_tcp_lnp” profile is recommended in low bandwidth scenarios so I’m not sure if during a DDoS attack it is best to switch the profile on your vserver temporarily to help keep your ICA traffic flowing. This is something I need to test. Compare the screenshot between the default TCP profile vs the XA/XD specific one. To break it down:
Now compare that against the lnp profile:
4. Alerting – Use AAA syslogging to alert you of suspicious login activity. Splunk, Kiwi, Command Center, etc. Set an alert that if you see X number of invalid logins within a couple of minutes period, send an email. See http://www.jasonsamuel.com/2014/05/28/best-practices-for-citrix-netscaler-aaa-logging-and-retention/
5. External monitoring – Always setup external monitoring of your URLs from multiple data centers around the world. Pingdom, Site24x7, Dotcom-Monitor, etc. are all good services for this and even offer some degree of free monitoring. I prefer extended validation when setting up monitors, not just looking at HTTP response codes or headers. Look for something near the footer of the web page like a copyright line. Until that page is fully loaded, I wouldn’t consider it a successful poll. Make sure to set response time alerts. If a page that normally takes 1 second to fully load is all of a sudden taking 10 seconds, you have a problem and need to know about it. You should also constantly be scanning your external resources for vulnerabilities and/or pen testing. Tools like Qualys, Nexpose, Cenzic, etc. for vulnerability scanning and penetration testing are good things to look into. 6. Don’t rely completely on IPS/IDS – Intrusion Prevention Systems and Intrusion Detection Systems are a good layer of security but that’s it, it’s just a layer. Typical HTTP floods will look like legitimate traffic to the IPS. And it will sit there and track each and every one of those connections quickly exhausting resources. An IPS is not designed with DDoS mitigation in mind where there could be tons of legitimate looking traffic thrown at it. It’s designed to inspect individual traffic streams and analyze behavior.
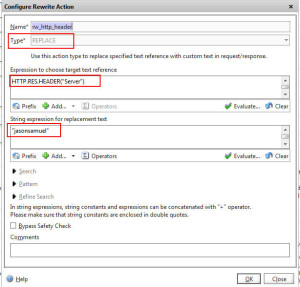
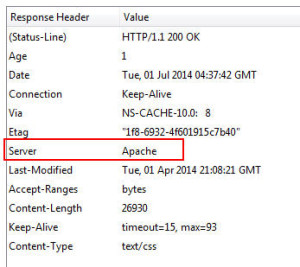
7. Obfuscation – I wrote about using your Netscaler to perform server header obfuscation several years ago to help prevent HTTP fingerprinting: http://www.jasonsamuel.com/2011/04/18/using-your-netscaler-for-http-server-header-obfuscation/. It’s an easy rewrite policy to configure and adds just one more layer of security. Now anyone that works on Netscalers on a daily basis can spot a Netscaler Gateway page a mile away no matter what skin or URL rewrites are being done so don’t rely on this extensively. It’s just an extra layer of security to slow down an attacker and I usually use this on my load balanced vservers more effectively which are usually custom websites than on Netscaler Gateway (Access Gateway) vservers which is pretty common. The article I reference in that post from Citrix is no longer available but here’s a quick example of how I do it:
-Create an Rewrite Action with the Rewrite Action of REPLACE -Set the replacement string to:
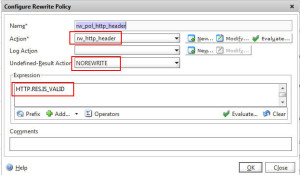
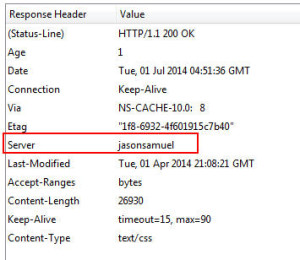
(in my example I set it to “jasonsamuel” for you easily see the change) -Now create a Rewrite Policy that binds to this action. Undefined Action is:
and Expression should be: then go ahead and bind this to your Netscaler Gateway vserver. Make sure to choose Rewrite (Response) and not Rewrite (Request) or it won’t bind. You can also set this globally via GUI. Just go to System > Settings > Configure HTTP Parameters > Server Header Insertion. Check it to enable it and type in whatever you like in the box to set the server header. I never do it this way and prefer to do it via the rewrite policy and bind globally.
Anyhow, use the HTTPFox or Live HTTP Headers FireFox addons to quickly verify the change:
vs. 8. Verify management IPs – The Netscaler by default is set to only allow administration on the NSIP for management tasks. But if you walk into a new environment where someone else stood up the Netscaler, they could have enabled it on a SNIP, MIP, or VIP for whatever reason and this is a huge security issue if an attacker uncovered it. Always double check.
9. Verify all local accounts – Audit them. Document them. Change the default nsroot password to a 25 character plus passphrase. Use integrated AD authentication if possible and set granular policies for any admins that don’t need full access to all modules on the Netscaler.
10. Do not enable verbose login error messages – http://blogs.citrix.com/2014/06/11/enhanced-authentication-feedback/ talks about enabling Enhanced Authentication Feedback. Don’t do it. Never give an attacker any information to work with. If you’re troubleshooting something, use AAA logging instead. 11. Lockdown SSL settings – I talked about this a few years back: http://www.jasonsamuel.com/2010/08/09/verifying-that-sslv2-and-weak-ciphers-are-disabled-for-pci-compliance/. Verify you are allowing only the strong SSL/TLS protocols and weak SSL ciphers are disabled. You only want to enable what you need to pass whatever compliance your organization may have to meet (SOX, PCI-DSS, HIPAA, FERPA, etc.). Use an external tool like Qualys’s SSL Labs website (https://www.ssllabs.com/ssltest/) to verify you are good.
then bind to your vserver (again, do it command line, GUI is finicky):
12. 2 factor authentication – RSA SecurID, Symantec VIP, etc. are all supported. Tons of SMS based services too if you don’t want to use soft tokens (smartphone apps) or hard tokens (keychain fobs). Remember, the Netscaler Gateway can do primary and secondary authentication. Set the one time password (2 factor auth token) to be the first and set the AD authentication policies to be the second. That way valid AD accounts are protected from lockouts by an attacker. There is no excuse to not use 2 factor authentication in your organization. It is dirt cheap to implement and mitigates so much risk you’d be stupid not to. Use it.
13. Setup Command Center and Insight Center – They’re both free so use them. Depending on your license level you’ll get a certain feature set. If you’ve got a Netscaler, there is no excuse. You need to be running them. The automated config backups of Command Center alone can save you in the event of a catastrophic attack. Insight Center can help uncover unusual behavior and traffic spikes:
Citrix Command Center: Citrix Insight Center: 14. Managed IPS/IDS & Firewall log review – There are so many managed services out there to review your firewall and IPS/IDS logs in realtime. There are companies with NOCs dedicated to respond to issues 24/7 so you don’t have to. Look into something like this from Alert Logic, Trustwave, SecureWorks, 403 Labs, etc. if you don’t have the resources available on staff. I’ve been in a couple of situations in my career where a phone call from one of these third party solutions uncovered something internal monitoring missed and we were able to respond to the issue before it became a bigger problem. As I said above, make sure you enable syslogging and see if one of these companies can watch for Netscaler related activity for you. Even a spike in CPU you could easily see using SNMP monitoring could indicate a problem and having someone dedicated to monitoring will come in handy.
I hope this article helps you out. Please do leave a comment below if you have any DDoS or brute force attack mitigation techniques you’d like to share.
Jason Samuel is a visionary product leader and trusted advisor with a proven track record of shaping strategy and driving technology innovation. With extensive expertise in enterprise end-user computing, security, cloud, automation, and virtualization technologies, Jason has become a globally recognized authority in the IT industry. His career spans consulting for hundreds of Fortune 500 enterprises across diverse business sectors worldwide, delivering cutting-edge digital solutions from Citrix, Microsoft, VMware, Amazon, Google, and NVIDIA that seamlessly balance security with exceptional user experiences. Jason’s leadership is amplified by his dedication to knowledge-sharing as an author, speaker, podcaster, and mentor within the global IT and technology community. Recognized with numerous prestigious awards, Jason’s contributions underscore his commitment to advancing technology and empowering organizations to achieve transformative results. Follow him on LinkedIn. Disclaimer: Views expressed here are his own and do not reflect the views of his employer, past or present, or any organizations he is affiliated with. Content is for informational or personal purposes only.HTTP.REQ.URL
nsconmsg -K /var/nslog/newnslog -d current | egrep -i respondernsconmsg -K /var/nslog/newnslog -d logfromnfw
show audit messageaction
show audit messages -loglevel ALERTtail -f /var/log/ns.log
-Set the expression to:HTTP.RES.HEADER("Server")
"Server"
NOREWRITE
![]()
TLS1.2-ECDHE-RSA-AES256-GCM-SHA384
TLS1.2-ECDHE-RSA-AES128-GCM-SHA256
TLS1.2-ECDHE-RSA-AES-256-SHA384
TLS1.2-ECDHE-RSA-AES-128-SHA256
TLS1-ECDHE-RSA-AES256-SHA
TLS1-ECDHE-RSA-AES128-SHA
TLS1.2-DHE-RSA-AES256-GCM-SHA384
TLS1.2-DHE-RSA-AES128-GCM-SHA256
TLS1-DHE-RSA-AES-256-CBC-SHA
TLS1-DHE-RSA-AES-128-CBC-SHA
TLS1-AES-256-CBC-SHA
TLS1-AES-128-CBC-SHA
SSL3-DES-CBC3-SHA
The NetScaler GUI may not play nice when trying to order these so just run the following via command line and name the cipher group whatever makes sense for you. If the order is not right you get may get Forward Secrecy warnings when running the SSL Labs test so best to just copy and paste this into Notepad, make your name change, and then copy and paste the whole block into an SSH window:
http://support.citrix.com/proddocs/topic/netscaler/cc-gen-commmand-center-wrapper-con.html
http://support.citrix.com/proddocs/topic/netscaler/ni-main-wrapper-con.html



Midwest Citrix Admin
October 22, 2014 at 1:19 PM
Jason,
How do you get clear reports out of all of the syslog data? We have ours going to a Solarwinds Syslog server but trying to turn it into a report or something that clearly states when someone logged in and when they logged out/timed out is a nightmare. We only have the Citrix Netscaler Gateway VPX license and just found out from Citrix that it does not support appflow so that immediately rules out Citrix Insight.
Thanks,
Midwest Citrix Admin
Jason Samuel
December 29, 2014 at 3:04 PM
Midwest Citrix Admin,
I use Splunk or Citrix Command Center and filter for any events with these event types:
LOGIN_FAILED
LOGIN
LOGOUT
You can also look at ICA start and end using:
ICASTART
ICAEND_CONNSTAT
You can then create a daily report off of this. Citrix Insight Center is what you really need to view ICA traffic and is much better for troubleshooting purposes. Syslog is mainly for security in my opinion. Insight Center works just fine with VPX but you must have an Enterprise or Platinum license to see HDX Insight traffic (ICA traffic). It really is worth it to upgrade if at all possible. The metrics you can pull and report on are phenomenal.
And if you use Rate Limiting (bullet point #2) as I suggested in the article, filter for the word “attack” and setup real-time alerts for those.
Pingback: NetScaler System Configuration | Carl Stalhood
Kevin Bryan
February 12, 2016 at 9:10 AM
Any possibility of using a strict referral policy? I know it’s minimal but was asked if we could restrict the logon to only come from a specific url a user would have to authenticate to first via captcha/AD Account?
Ben
May 18, 2016 at 10:44 PM
Hi Jason,
Great article. I am trying to implement rate limiting and it works well as per your example using expressions:
CLIENT.IP.SRCHTTP.REQ.URL
What I would like to do is exclude our internal subnet from matching this policy as our servers communicate through the NetScaler at a much higher rate this what we want to allow clients to connect, so I implemented this:
CLIENT.IP.SRCHTTP.REQ.URL
CLIENT.IP.SRC.INSUBNET(10.0.0.0/8).NOT
Although it still seems to match/drop my
10.0.0.0/8traffic when the rate is reached. Any idea on how to prevent this?Thanks,
Ben
Pingback: Citrix Netscaler VPX, configuración básica - MundosysadminMundosysadmin
Pingback: NetScaler 10.5 System Configuration – Carl Stalhood
Pingback: NetScaler 11.1 System Configuration – Carl Stalhood
Pingback: NetScaler 11 System Configuration – Carl Stalhood
Anisur
February 22, 2024 at 9:49 PM
Hi Jason,
I read your blogs and its quite good and eye opening for me.
I need an input from you, we are implementing as per our vendor suggestion the rate limit on Citrix Netscaler in production as 4 request per 10 Seconds however you have mentioned in above blog that time slice is way too high for production. Can you explain me why ? And what are examples ideal for production environment without impacting legitimate users in production.